Activate the Asset Management add-on
The first step is activate the Asset Management add-on in Settings > ServiceM8 Addons. Find “Asset Management” in the list, click on it, then click the switch to turn on the add-on. Please note:
Not all ServiceM8 Plans include Asset Management. You may need to upgrade your plan in order to activate the add-on.
In order to create Assets, you will need to order physical Asset Labels from ServiceM8. Refer to the Asset Labels article for more information on ordering labels.
Please note:
Not all ServiceM8 Plans include Asset Management. You may need to upgrade your plan in order to activate the add-on.
In order to create Assets, you will need to order physical Asset Labels from ServiceM8. Refer to the Asset Labels article for more information on ordering labels.
Setting up Asset Types
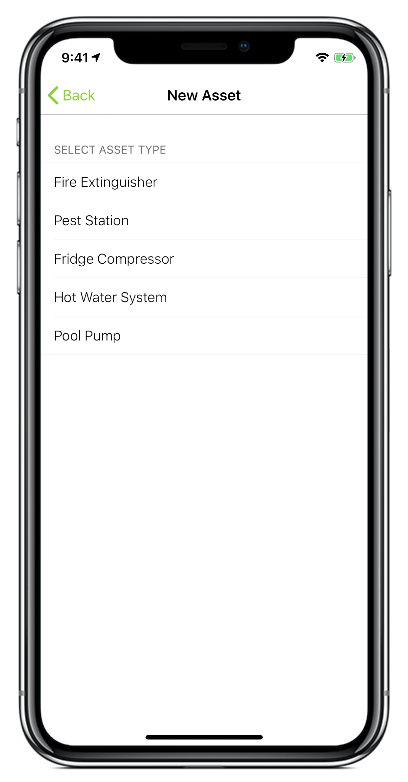
All Assets in ServiceM8 have an “Asset Type”, which helps you to organise Assets according to which information you need to track. Examples of Asset Types include Appliance, Fire Extinguisher, Smoke Alarm, Vehicle and so on. The Asset Type specifies which fields are available on each Asset, so for example an Appliance may have Make, Model and Serial Number. For a Vehicle, you might want to track the odometer reading, the VIN number, or the engine capacity. To create an Asset Type, go to Settings > Assets and click the “Setup Asset Types” button at the top right.
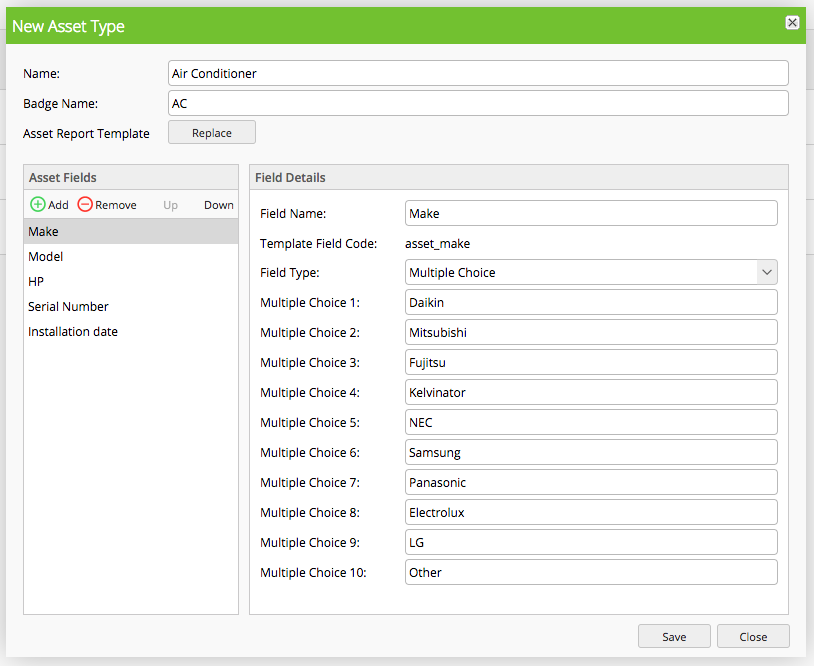
- All Assets in ServiceM8 have “Name” as a default field, so you don’t need to create it manually.
- When you create an Asset of a particular type, all of the Asset Type fields will be mandatory. Keep this in mind when creating your fields, and only add fields which will be applicable to all Assets. When creating multiple choice questions, it’s usually a good idea to include a “None” or “Not Applicable” option as well.
- When deciding how many Asset Types to create, consider which information needs to be stored per Asset. For example, if your company works with Dishwashers, Refrigerators, and Washing Machines, you could choose to create an Asset Type for each of these, or you could create a generic “Appliance” Asset Type. If you need to track information specific to the Asset Type such as “refrigerant type” for a Refrigerator or “front/top loader” for a Washing Machine, then you would need to create separate Asset Types. If you track the same information for all Assets (e.g. Make, Model, Serial Number, Installation Date), then you can set up a generic “Appliance” Asset Type which will be quicker, and simpler to work with.
Creating a New Asset
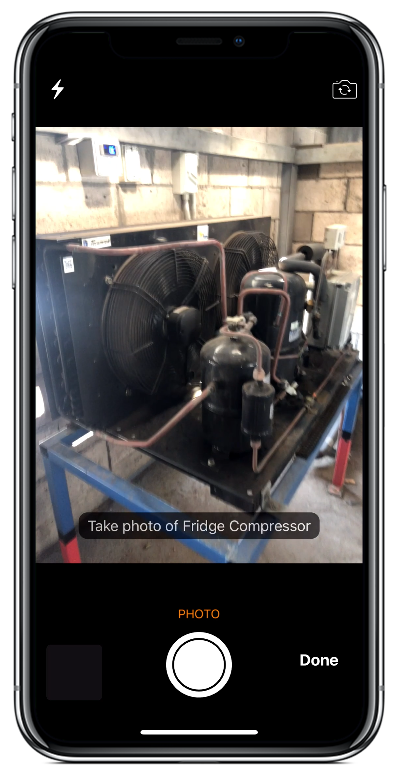
Assets can only be created in the ServiceM8 mobile app. First, apply an Asset Label to the physical item you want to track. Open the relevant job in the ServiceM8 mobile app, then tap the Assets menu. If this menu is not visible, you’ll need to apply the relevant Asset Type badge to the job first.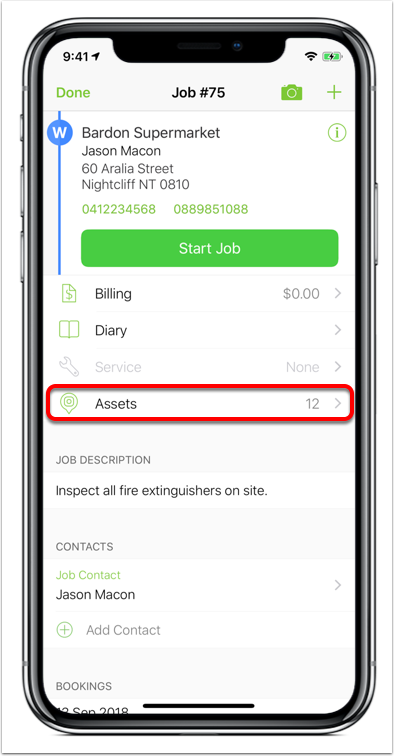

Working with Assets in the ServiceM8 app
Open the relevant job in the ServiceM8 mobile app, then tap the Assets menu. If this menu is not visible, you’ll need to apply the relevant Asset Type badge to the job first.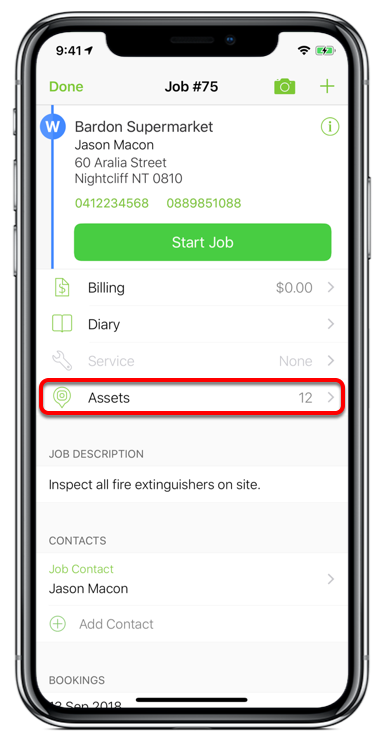
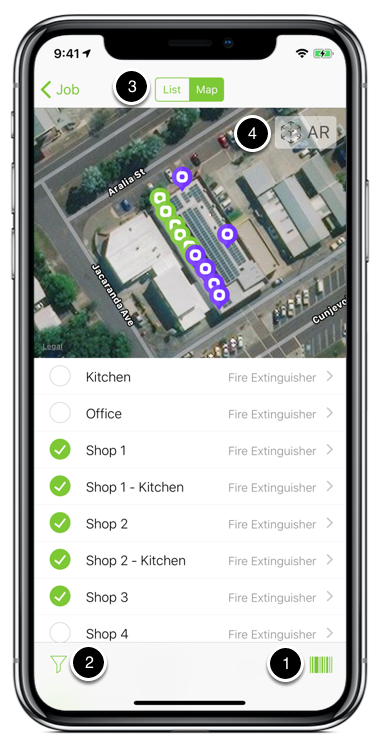
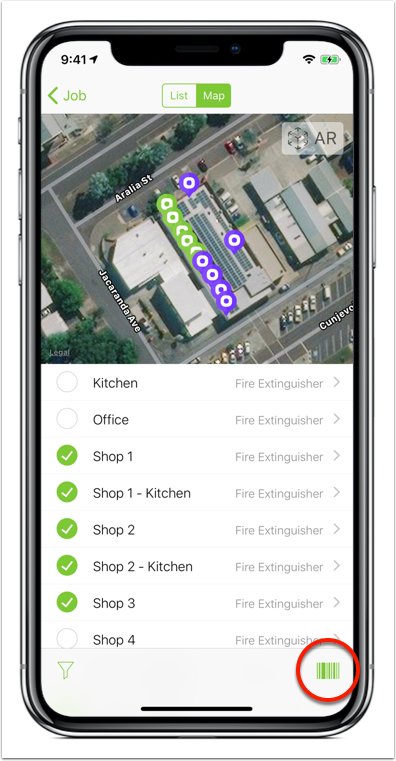
- To view the information for an Asset which you’ve already physically located, tap the barcode icon in the bottom right and scan the Asset Label, which will show you the details for that Asset. If you are using iOS 12 or later, you can also scan the label from the ServiceM8 Camera without needing to go into the Assets menu.
- If a client has a large number of Assets on site, you can filter the list to only show a specific Asset Type using the Filter icon at the bottom left.
- To help locate Assets at a client’s site, ServiceM8 has two handy features. Tap the “Map” option at the top of the list of Assets to view the position of the Assets on a map. This also gives you a visual representation of which Assets have had Forms completed on the current job, by changing the colour of their Asset icon to green.
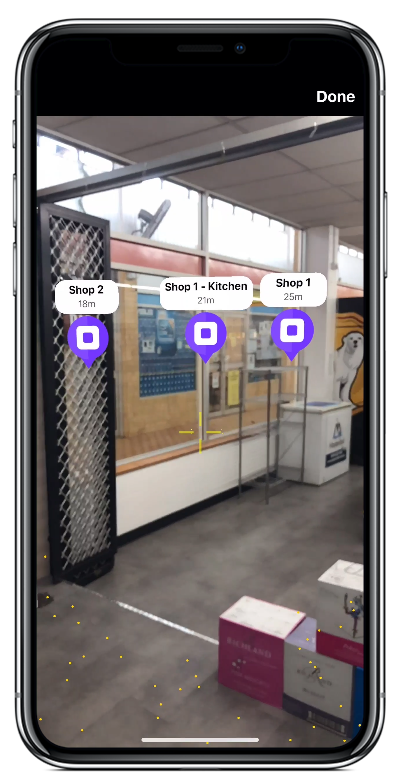
- Sometimes a map can be hard to interpret, especially on large sites, so ServiceM8 also includes an Augmented Reality view of your Assets. Tap the “AR” icon to open the AR Asset view, and scan any existing Asset:
- This feature requires iOS 12 and an AR-compatible device (iPhone 6S or newer);
- You can also access the AR Asset View by scanning any Asset Label from within ServiceM8 Measure.
Working with Assets in your Online Dashboard
As previously noted, Assets can only be created in the ServiceM8 mobile app. However, once they have been created, you can view and edit them online. To see a list of all your Assets, go to Settings > Assets.
- You can use the Search feature to quickly find an Asset by name (please note that Asset Fields other than Name are currently not searchable in the online Assets view); or
- You can use the Filter options to narrow down the list by Asset Type or by Client.
- Click the “Edit” button next to any Asset to open it. Here you can see the basic Asset details, as well as its Photo, and a history of Forms completed for the Asset:

Relocating Assets from One Client to Another
Assets can be quickly moved between clients - this is very handy for rental/hire companies which need to track which client currently has an Asset which is owned by the business itself. In order to move an Asset to a different Client, the Asset needs to have a Form completed on it from within a Job for the new Client. First open a Job for the new Client. Tap the Assets menu (you may need to apply an Asset badge to the job first), then tap the barcode icon to open the Asset scanner. Scan the Asset Label to open the Asset Details. Tap the “+” button at the top right to start a Form. If the Asset is currently assigned to a different client, you will be prompted to re-assign the Asset to the current client. Once you confirm the re-assignment and complete the Form, the Asset is automatically moved to the new Client.